


Troubleshooting a Shower Filter: Check Sediment, Leaks and Smells
Most shower filters need replacing every 4-6 months, but sediment, leaks, unusual noises or a returning chlorine smell can signal a problem sooner. Effective shower filter troubleshooting starts with the symptom: check for buildup, identify where water is escaping, and notice whether a new cartridge’s initial discoloration or sound clears quickly.
A change in your shower shouldn’t be dismissed as a cosmetic nuisance. It may mean the filter needs attention, but a drip, sound or smell can have different causes. This shower filter troubleshooting guide explains what to inspect, which checks are safe, and when a cartridge replacement may be the right next step. It also shows how to distinguish a brief first-use effect from a persistent issue, and how to assess a chlorine-like smell without jumping to conclusions. Start with clear observations, then choose a practical next step.
Key Takeaways
- Check sediment and discoloration to spot when a cartridge may need attention or replacement.
- Trace drips to the connection, then address the seal before water damage spreads.
- Use changes in whistling, vibration, or rattling as clues to investigate flow through the filter.
- Compare the chlorine smell with and without filtration, and treat a persistent change as a reason to inspect the cartridge.
1. Sediment buildup and cleaning sediment guards
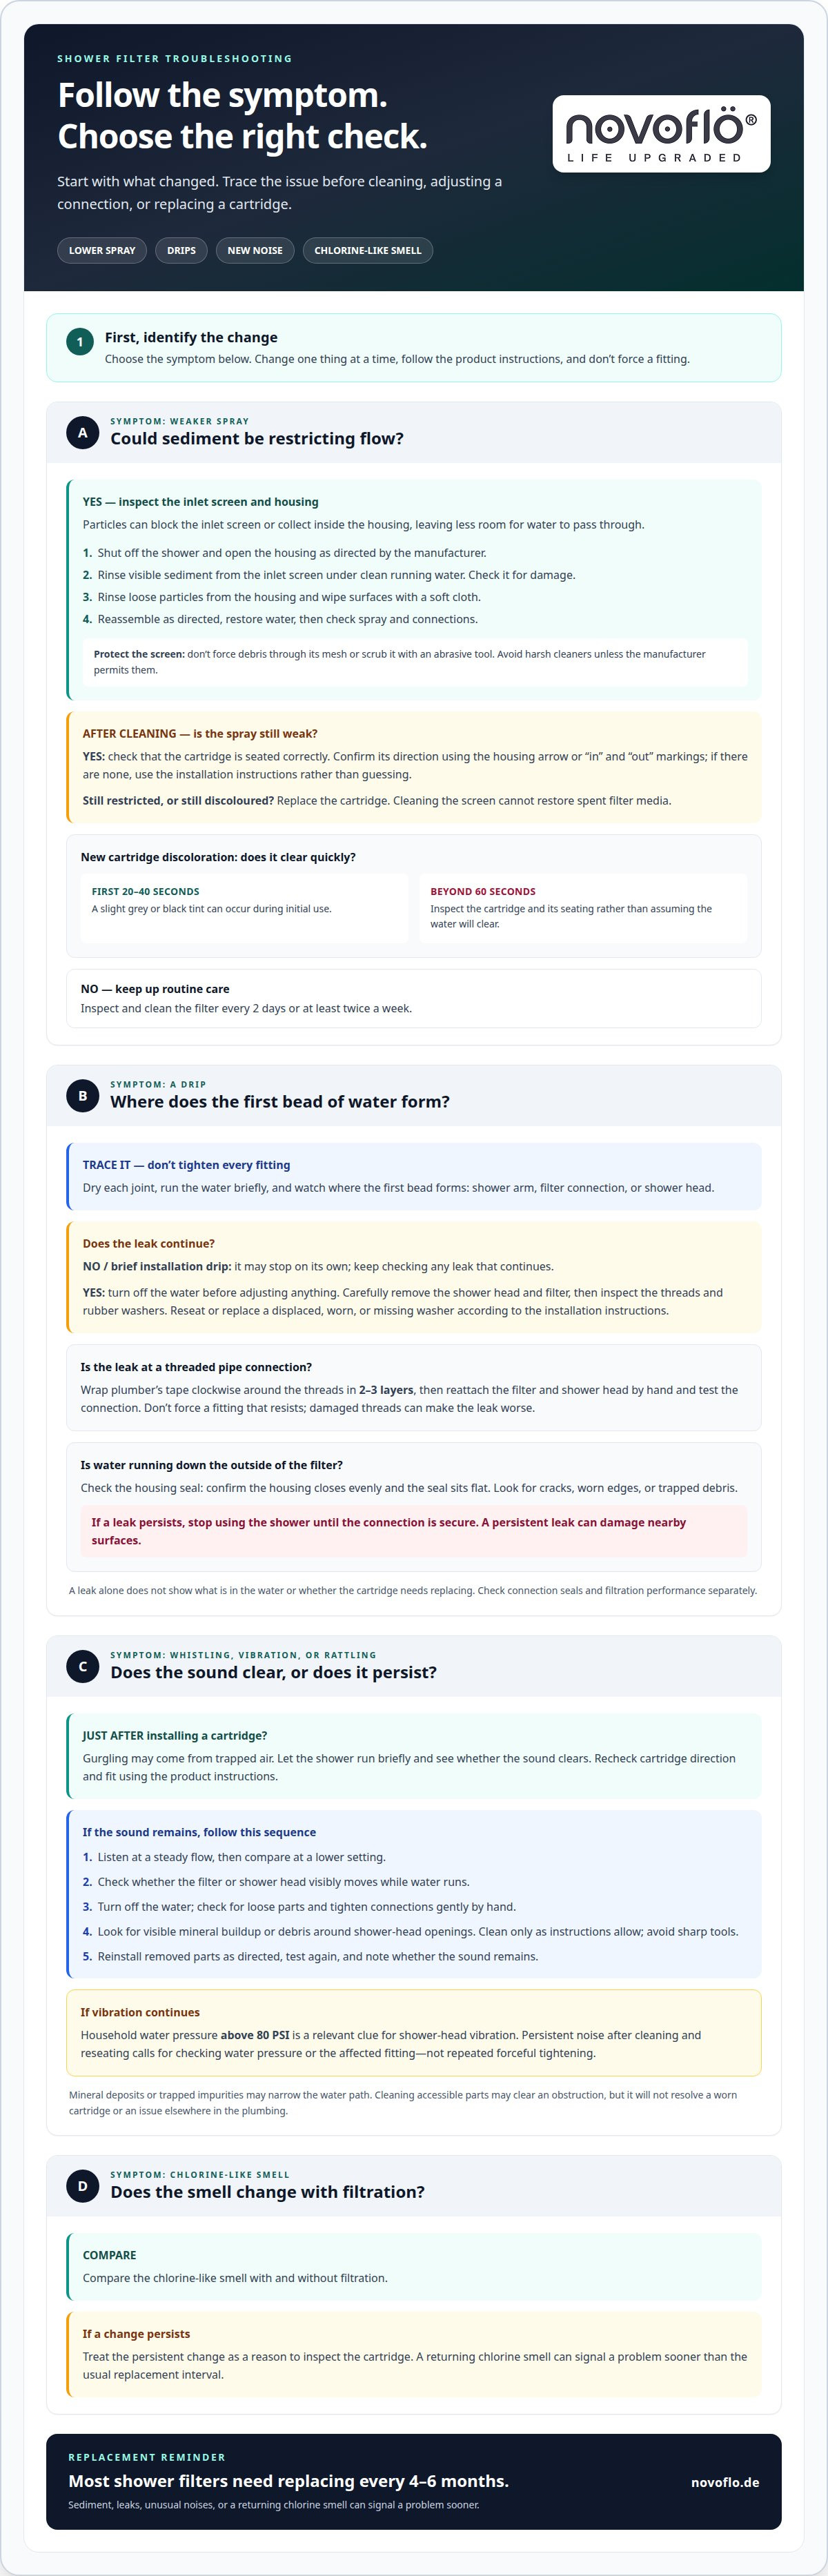
A weaker spray often points to sediment buildup, a blocked inlet screen, or debris caught in the filter housing. As particles collect, water has less room to pass through, so pressure at the shower head can fall. This is one of the first checks in shower filter troubleshooting.
A new cartridge can release a slight grey or black tint during its first 20 to 40 seconds of use. If the discoloration continues beyond 60 seconds after installation, inspect the cartridge and its seating rather than assuming the water will clear on its own.
Clean the filter carefully. Shut off the shower, then follow the manufacturer’s instructions to open the housing. Keep the parts in order, so they go back together correctly.
- Remove the inlet screen and rinse away visible sediment under clean running water.
- Check the screen for damage. Don’t force debris through its mesh or scrub it with an abrasive tool.
- Rinse loose particles from the housing, then wipe its surfaces with a soft cloth.
- Reassemble the filter as directed, restore the water, and check the spray and connections.
For routine care, inspect and clean the filter every 2 days or at least twice a week. Avoid harsh cleaners unless the manufacturer specifically permits them; residues or damaged seals can create new problems.
Why is your shower filter reducing water pressure? Sediment on the inlet screen or buildup inside the housing can restrict flow. Clean those areas first; if pressure stays low, check that the cartridge is seated correctly.
To confirm the filter’s direction, look for an arrow or “in” and “out” markings on the housing, then align them with the water’s flow from the pipe toward the shower head. If there are no markings, follow the product’s installation instructions rather than guessing.
Replace a cartridge that remains discoloured or continues restricting flow after cleaning. A clean screen cannot restore spent filter media.
2. Leaks around the filter or shower head
A drip can come from the shower arm, a filter connection or the shower head. Dry each joint, run the water briefly, and watch where the first bead forms. That identifies the connection to inspect, instead of prompting you to tighten every fitting.
A brief drip during installation may stop on its own, but check any leak that continues. If it continues, turn off the water before adjusting anything. Remove the shower head and filter carefully, then inspect the threads and rubber washers. A displaced, worn, or missing washer can prevent a tight seal. Replace or reseat it according to the filter’s installation instructions.
For threaded pipe connections, wrap plumber’s tape clockwise around the threads in 2-3 layers. Clockwise wrapping helps the tape stay in place as you tighten the fitting. Reattach the filter and shower head by hand, then test the connection. Don’t force a fitting that resists; damaged threads can make the leak worse.
Water running down the outside of the filter may point to a housing seal problem, not a pipe-thread problem. Check that the housing is closed evenly and its seal sits flat. Look for cracks, worn edges, or trapped debris before reinstalling it. A persistent leak can damage nearby surfaces, so stop using the shower until the connection is secure.
What water conditions and shower filter standards apply in Egypt? Water quality can vary by supply and building, so a leak alone can’t identify the water’s contents or filtration needs. Follow the filter’s stated specifications and installation directions; don’t infer reduced chlorine or metals removal from a dry connection.
A leak does not automatically mean the cartridge needs replacing. If you also notice reduced flow, an unusual water appearance or a persistent smell, inspect the cartridge separately. Connection seals and filtration performance require different checks.
3. Addressing whistling, vibration, and rattling
A new whistle, vibration, or rattle can signal restricted flow or a loose connection. Household water pressure above 80 PSI can cause shower-head vibration. Mineral deposits or trapped impurities may also narrow the water’s path through the filter. Note whether the sound starts immediately, appears only at full flow, or changes when you adjust the shower head. That pattern helps narrow down the cause.
Start by turning off the water and checking whether the filter housing or shower head is loose. Tighten connections gently by hand, following the installation instructions. Don’t force a fitting, since overtightening can damage threads or seals. If you hear gurgling just after installing a cartridge, trapped air may be the cause; let the shower run briefly and see whether the sound clears.
If the noise continues, look for visible mineral buildup or debris around the shower head openings. Remove the shower head only if its instructions allow it, and rinse away loose particles. Avoid sharp tools that could damage the openings. Cleaning accessible parts may clear an obstruction, but it will not resolve a worn cartridge or an issue elsewhere in the plumbing.
Use this sequence to troubleshoot without changing several things at once:
- Listen at a steady flow, then compare the sound at a lower setting.
- Check whether the filter or shower head visibly moves while water runs.
- Clean accessible openings and reinstall removed parts according to their instructions.
- Test again, and note whether the whistle, vibration, or rattle remains.
A sound that starts after replacing a cartridge may point to seating or installation, rather than the filter media itself. Recheck the cartridge direction and fit using the product instructions. If the shower head still vibrates, household pressure above 80 PSI is a relevant clue. Don’t assume a filter removes every mineral or impurity; performance depends on its design and stated capabilities. Persistent noise after cleaning and reseating calls for checking the water pressure or the affected fitting, not repeated forceful tightening.
4. Chlorine smell and possible chloramine
A chlorine-like smell can persist even when water looks clear. Smell alone cannot identify a chemical or prove that a cartridge has stopped working. To compare, run the shower once without the filter and once with it, keeping the conditions as similar as possible. Note whether the odour changes between the two tests.
If the odour is stronger after several days without use, run hot water through the filter for 30-60 seconds before showering. Then assess the smell again. A persistent change, especially alongside unusual water appearance, calls for checking the cartridge and its installation instructions. Replace the cartridge if the product guidance indicates it has reached the end of its service life.
Chlorine and chloramine are different disinfectants, and a chlorine-like smell does not establish which one is present. A comparison at the shower can show whether the filter changes the odour under those conditions, but it cannot identify the water’s chemical composition. Do not use scent as a water-safety test or proof of a specific contaminant.
Do shower filters remove chlorine, hard water minerals, or bacteria effectively? It depends on the filter media and the specific contaminants its design is intended to reduce. Carbon media can target certain chemicals, but don’t assume a shower filter also removes hardness minerals or bacteria unless its product specifications support that claim.
Use these checks to make the comparison more useful:
- Keep the same shower head and water setting for both runs.
- Compare the smell promptly, rather than relying on memory later.
- Record whether the cartridge is new, recently installed, or due for replacement.
- Check the product information for its stated filtration targets, including chlorine and any named chemical.
Filter performance matters for skin and hair, but an odour change alone doesn’t measure it. If you want a filter designed to reduce chlorine and targeted impurities, explore shower filtration options and compare the stated filtration purpose with your concern.
Novoflö: Novoflö shower filter
Novoflö shower filter is a practical next step when a worn cartridge, persistent chlorine smell, or recurring flow issue points to filtration needs. German-engineered for domestic water conditions in Egypt, it reduces chlorine and targeted impurities to support healthier skin and hair.
Use the checks above first: clean accessible parts, address leaks, and follow the filter’s installation and cartridge instructions. If you want to make shower filtration part of your routine, Novoflö’s filter is designed to reduce chlorine and targeted impurities without a drop in water pressure. It addresses shower water, not plumbing faults or every water-quality issue.
For information about the Novoflö shower filter, contact Novoflö.
Make your next step a deliberate one
After any adjustment, note what changed: the sound, flow, smell or visible condition. This creates a useful baseline for the next shower and helps distinguish a one-off change from a recurring pattern. Effective shower filter troubleshooting means observing first, then making one careful adjustment at a time.
Keep the bigger goal in view, too. A plumbing fault and a filtration need are different problems, even when they appear during the same shower. If you’re considering a filter, focus on its stated purpose and the water concern you want to address. Choose with clarity, not guesswork. Send Novoflö a message to discuss the Novoflö shower filter, and take the next step toward a more considered shower routine.
Frequently Asked Questions
How Often Should Shower Filters be Replaced?
Many shower filters are replaced every 4-6 months, but the cartridge maker’s schedule takes priority. For Novoflö cartridges, the stated interval is 3 months for families; 4-6 months for individuals. Water quality and shower frequency affect cartridge use. Keep track of the installation date, then follow the product’s replacement guidance instead of relying on a general interval alone.
How do I fix a leaking shower filter housing or connections?
First identify whether water is escaping from a threaded joint or the filter housing seam. Turn off the shower, dry the area, then inspect the washer and housing seal for misalignment or visible damage. Reseat an intact seal and reconnect the parts by hand, following the installation instructions. If the housing is cracked or the leak continues, stop using the filter until the damage is addressed.
Why does my shower filter smell bad or discolor the water?
A new cartridge can cause slightly grey or black-tinted water during its first 20 to 40 seconds of use. If discoloration continues beyond 60 seconds after installation, inspect the cartridge. A returning chlorine-like smell may signal that the filter needs attention, but smell alone can’t identify a specific chemical. Compare the odour with and without filtration, and check the cartridge’s replacement schedule.
How can I tell when a shower filter cartridge needs replacing?
Use the cartridge’s stated replacement interval, then watch for changes that persist after routine cleaning. Reduced flow, unusual water appearance, or a returning odour can all prompt an earlier inspection. For Novoflö cartridges, the stated interval is 3 months for families and 4-6 months for individuals. Record the installation date so you can compare symptoms with the cartridge’s age.


